You have no items in your shopping cart.

In this latest tutorial, we unravel the step-by-step process of creating durable and precise molds using RTV (Room Temperature Vulcanizing) silicone. Whether you're a hobbyist looking to replicate your favorite objects or a professional seeking to refine your mold-making skills, this article is tailored just for you. We'll guide you through the entire process, starting from the very basics of the supplies you'll need, to measuring, mixing and pouring the silicone.
**Important note: We now carry ArtiSil Silicone instead of ProSil. It will work just the same.
Needed Supplies:
Before you get started on your project, here is a list of supplies you will need. We will discuss some of them more in depth in the tutorial.
-Your plug (the part you want to replicate)
-Something to cast in whether it is a plastic cup, a box you make out of wood, a water bottle cut to size, etc.
-Glue- hot glue applied with a glue gun works well
-Clay (modeling clay)
-Large mixing cup
-Paint paddle or stir stick
-Small scale if you need to measure your silicone by weight
-Mold release or petroleum jelly (not essential but a good idea to use)
-Knife, razor blade or scalpel
-Safety supplies including gloves

The Part Used to Make a Mold
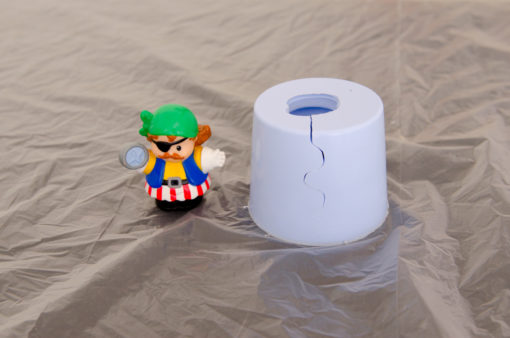
If you are looking to make a silicone mold, you obviously have something you want to replicate. In this demonstration we are using a child's 'Little People' pirate.
Mold Box or Container
You will want to have some sort of container to make the mold in. We used a small measuring cup. Another option is to make a mold box out of plywood or corrugated plastic. There are many materials you can use but make sure it is not porous. To construct the box you will want it to be 1/4" to 1/2" larger on each side of your plug (the part you are replicating).
If you are making a box, first measure your plug, then add the extra inches to the base.

Next, you will want to use glue to anchor your prototype to the center of the base of your container. Hot glue guns work well for this. That way you can easily remove your plug/figurine when you are done. You could also use screws if you want. Use clay to fill in any gaps where you connected your plug to the base.

If you are building a box, you can then cut the sides to size. It doesn't matter how tall you make the sides as long as it is tall enough for you to cover your plug. Glue or screw together all the pieces making sure there are no leaks. Don't put a top on the box. Other options for a mold container are a clear mailing tube, plexiglass or a water bottle. Whatever you choose, make sure it has a smooth surface.
Safety
Before you start working with the silicone, make sure you are working in a well ventilated area. Use gloves to protect your hands and either coveralls or an apron to protect your clothes.

The Two Part Silicone
RTV silicone comes in two parts. The mixing instructions vary by the type and brand you buy. Some are an easy one to one ratio and some are by weight. If the silicone you buy is by weight, use a small scale to measure out the two parts. The one pictured above is a 10:1 ratio by weight or volume. Figure out how much silicone you need to cover your plug before starting. You don't want to mix too little!

It is not imperative to use mold release but it is a good idea. You can use a release like ISOKote, Ease Release 2300 or even petroleum jelly. It makes the mold easier to work with.
Measuring and Mixing
Measure out the two parts of silicone. Some people will measure Part A in one cup and Part B in another cup. Then they will combine both into one large cup.

Mix really well with a paint paddle or stir sticks. Mixing well is crucial. Make sure you scrape the sides and bottom until you have a uniform color. There should be no streaks when you are done. You do not want any uncured spots in the end. You can roll around the mixing cup to try to get air bubbles out before you pour it into you mold container.


Pouring the Silicone and Curing
Pour a thin stream of silicone into the mold container on one side. Let the silicone work itself around your plug. Tilt your mold box/container from side to side to work out air bubbles. They should flow to the top. The cure time time varies by the silicone you buy.

This particular silicone took 16 hours at room temperature.

Releasing the Part from the Mold
For this particular demonstration, the side of the plastic cup was cut to release the mold. If you made a mold box you can tear away the sides or unscrew the wood pieces, depending on the material you used. This makes it easy to get your silicone mold out.

Using an exacto knife or scalpel, make a zig zag cut in the silicone. Don't cut all the way through on your first cut. Slowly cut the silicone away from your plug. You do not want to rip or tear the mold.

Your plug should easily pop out.


If you cut the mold correctly, it should go back together nicely. You can fit it back into your mold box or plastic container to prepare it for casting. Once that is done, you are ready to replicate your plug.
More Info
To see the process of Casting in this Silicone Mold, you can go HERE.
If you would prefer the video version of this process- CLICK HERE
We also have a blog post with Tips for Working with RTV Silicone that may be helpful. CLICK HERE
**ProSil is no longer one of our brands but we now have ArtiSil. ArtiSil 1025T is the equivalent to ProSil 1025.
If you have any more questions, don't hesitate to reach out to us by email at sales@fiberglasswarehouse.com or phone 833-669-7899


